March 27, 2014

Meet the Designers at Squishy Cute Designs!

We’re so excited to partner with Squishy Cute Designs to offer a fantastic give-away!  One of our customers introduced us to this delightful company and we think you’ll love them too.  Their whimsical designs will bring a smile to your day.


Squishy-Cute Designs is a sewing pattern company run by Greta & Kelli, a mother/daughter team! They both have a passion for designing and creating, and they developed their company in 2009 as a way to put their ideas to good use. It started off as just a craft idea website, and slowly grew into the pattern shop it is today. Their patterns all use wool felt, and every one of them can be sewn completely by hand. They also have a website where they offer many free sewing and craft projects, and also provide other resources for crafters and hand-sewers. They recently started a newsletter as well, where they announce new patterns, works in progress, discounts, and other fun news! Their patterns can be purchased in their Etsy shop. 

Find Squishy Cute Designs online here:

Two of our favorite patterns from the gals at Squishy Cute Designs are their darling animals for spring:

Jelly Bean the Easter Cat


And

Daffodil the Easter Dog


We loved this pair so much that we put together a wool blend felt Bitty Bundle to make it easy for you to recreate the project.  We’ve named the bundle Jelly Beans in honor of this adorable little cat.  The bundle will make one each of the cat and dog, or use the bundle for any project your can dream up.  You can find the wool felt bundles on Prairie Point Junction’s website here, then head over to Squishy Cute Designs to order the downloadable patterns.  


But wait!  It gets even better!  We’ve put together a special Give-away!

Grand Prize: (2 will be awarded) Prize includes a Jelly Bean Bitty Bundle of felt from Prairie Point Junction and downloadable patterns for the Jelly Bean Cat and Daffodil Dog from Squishy Cute Designs.


Second Place Prize (2 will be awarded): For the second place prize, Squishy Cute Designs will be giving away a downloadable pattern set of their "April the Spring Doll" pattern and their "Harold the Hummingbird" pattern.


To enter, we invite you to visit  Squishy Cute Designs  and tell us what your favorite pattern is, then visit Prairie Point Junction and tell us what your favorite felt bundle is.  You’ll get one entry for your comment left on this specific blog post and one entry for your comment left on Squishy Cute’s Blog HERE.  (www.squishycutedesigns.com/blog/spring-giveaway-2014).  

We’ll draw from the comments to choose a winner on April 3rd, 2014.  Comments must be listed on this specific blog post OR Squishy Cute's specific blog post.

The fine print:  Please note that due to international sweepstakes laws, our give-away can only be open to US residents.  Can’t visit our sites for some reason?  Don’t fear, simply leave a comment telling us what you’d make with the felt if you won!


March 19, 2014

Cross-Country Shop Hopping!

A huge thank-you goes out to The Quilt Shop Navigator for their wonderful write-up about our shop.

We had the pleasure of meeting this delightful couple last summer during their cross-country journey visiting quilt shops.  Doesn't that sounds like a road-trip we should all take?

They stopped in at the very end of the day during our Summer Sidewalk Sales, so we may have been a little bit wilted by that time, but we certainly enjoyed their visit.  We love any chance to share our passion about what we do.


One of my favorite parts of the visit was the chance to talk about the sweetest business owners that were mentors to me when I was just a teenager working my first job.  You can tell I get a little teary in the video talking about my experience.  I'll chalk it up to the heat that day!

Seeing the interview made me go do a little digging around in old photos.  I managed to find a picture circa early 1990's of Melba Andres, owner of the Ben Franklin Store in Crete, Nebraska, and her brother Kenny Dunn.  The Ben Franklin store is long-gone, but I"ll always cherish my memories of my time there.  I wouldn't be where I am today without their guidance and dedication.


Thanks for revisiting old memories with me today!  I only hope that I can serve to inspire you as well!


Who inspired you when you were growing up?  Let us know in the comments below.


 Head on over to The Quilt Shop Navigator to check out the rest of the interview.

March 6, 2014

Saturday Sampler 2014 - Sew and Tell - Block #2

Welcome to Block #2:  Corner Coffee Shop, from our Saturday Sampler 2014, Sew and Tell Series.

Our block patterns will be posted on the 2nd Saturday of each month, so check back through the year to make all twelve sampler blocks with us.


What to cut:

A/B:  Moda Bleached White:  
A: (4) 2 3/8” x 2 3/8”, cut in half diagonally
B: (1) 3 1/2” x 3 1/2”

C/D:  Tulip Purple:   
C: (4) 2 5/8” x 2 5/8”
D: (4) 2” x 2”


E:  Papaya:   
E: (8) 2” x 3 1/2”

F/G:  Red:  
F: (4) 3 1/2” x 3 1/2”
G: (1) 4 3/16” x 4 3/16”, cut in quarters diagonally

H:  Cerise:  
H: (2) 4 3/16” x 4 3/16”, cut in quarters diagonally


To cut the squares in half diagonally, position your ruler from corner to corner of the square.  The ruler shown below is the Quick Trim ruler by Creative Grids. If your ruler has a 45 degree marking (the black line on the ruler in the photo) you can align the 45 degree marking with the edge of your square.  This will help ensure a perfect 45 cut across your square.


To cut a square in quarters diagonally, you'll follow the same method.  First cut the square in half diagonally.  Leave the pieces in place and cut in the opposite diagonal direction.


Create the center block units by arranging the triangles as shown.  The purple square is the 2 5/8" square.


There are several different ways that you can go about joining the units for this block.

One method is to join triangles and squares as shown below. (You can also join the units together in diagonal rows if you prefer).  In this arrangement, we pressed towards the Cerise colored triangles.


Continue to join the units together.


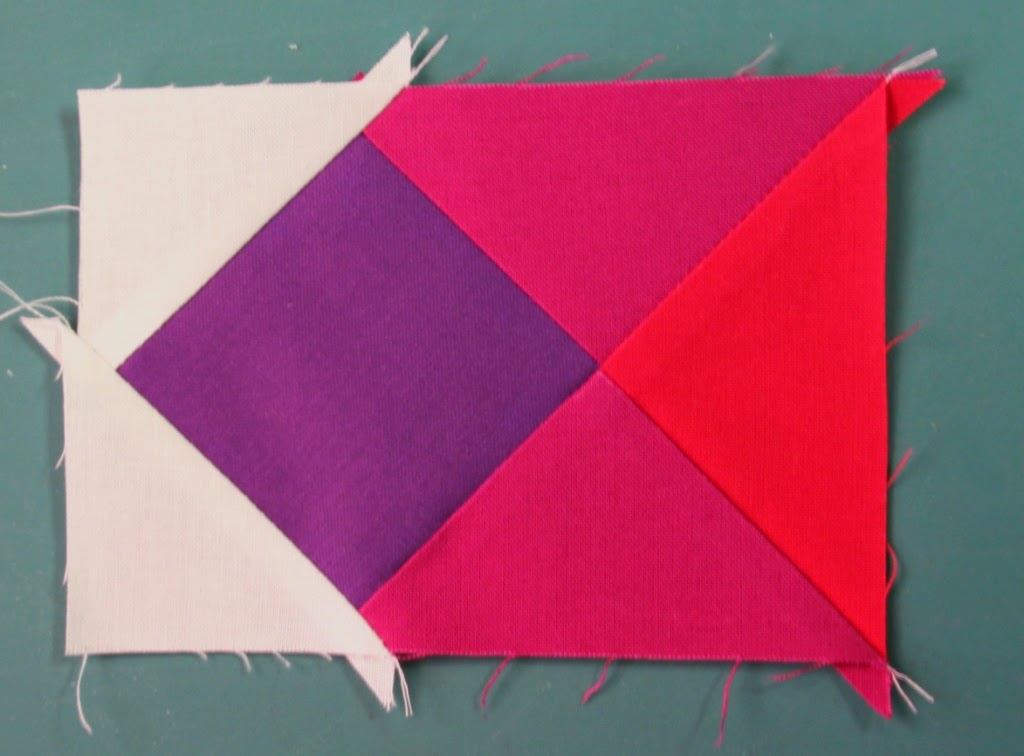
Add the white triangles to the unit.


Trim up the unit, removing the excess "rabbit ear" points.  The unit should measure 3 1/2" x 5" at this point.


To make the corner units, arrange pieces as shown.  The red square is 3 1/2".  The purple square is 2".


Join units as shown, pressing towards the red and purple.


Join units together.  Unit should measure 3 1/2" x 3 1/2".


Arrange block units into 3 rows of 3 units each.


Sew block units into rows.


Join rows together.


Block should measure 12 1/2" x 12 1/2".


Check back April 12th for Block #3.

Saturday Sampler 2014 - Sew and Tell - Block #1

Welcome to the 1st block in our Saturday Sampler 2014 Series.  We're excited to "Sew and Tell" throughout the year with you.

Let's get started on our 1st block:  A Very Good Place to Start!

Our blocks are 12 1/2" x 12 1/2" (12" x 12" finished)

All seam allowances are 1/4".

Here's the block in two colorways to show you how fabric choices make such a difference in how the block looks:


What to cut:
Cut four squares 3 7/8" x 3 7/8" each of four colors of fabrics:


Pair up the four colors into the following combinations:

              (2) A Bleached White with (2) C Tulip Purple
              (1) A Bleached White with (1) D Petal Pink
              (1) A Bleached White with (1) B Valentine
              (2) B Valentine with (2) D Petal Pink
              (1) C Tulip Purple with (1) B Valentine
              (1) C Tulip Purple with (1) D Petal Pink


Draw a diagonal line on the wrong side of the lightest colored fabric in each pair.  

I love to use the Creative Grids quick trim ruler.  It's so versatile and just the right size at 3 1/2" x 12 1/2".  The ruler has a slight textured surface in some strategic places on the back that help it grip your fabric, so no slipping when you cut or draw lines!  My other favorite feature is that one edge of the ruler is marked with whole numbers, while the other edge is marked in 1/2" increments.  You'll see later in this post how handy that is when trimming up blocks of varying sizes.

To draw the diagonal lines, I make use of the 45 degree marking on the ruler.  Line up the 45 degree line (it's a black line on the ruler) with the left edge of the fabric.  Position the edge of the ruler on the points of the square. Presto, you know have a perfect diagonal/45 degree line.


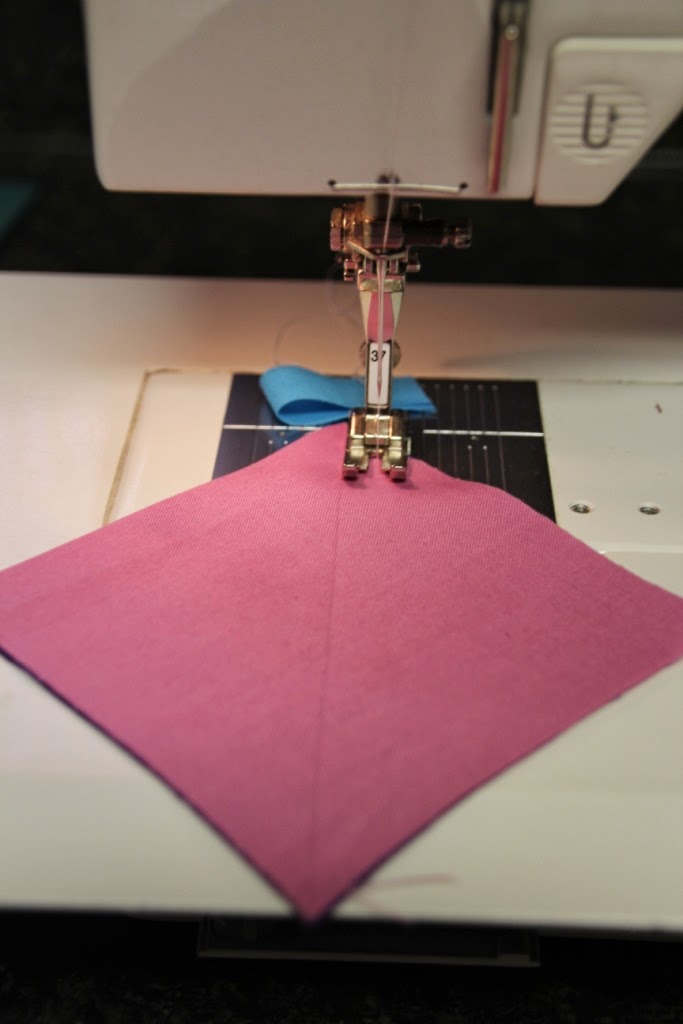
Sew 1/4” from both sides of drawn line.  The blue fabric you see in the background of the photo is my "starter" piece.  I prefer to always start sewing on a starter scrap whenever I can.  This helps keep my thread tails under control and helps prevent your machine from coming unthreaded.  Simply start sewing on the scrap, then let your machine do the work feeding your fabric along.

Sew a 1/4" to the right side of the drawn line.


Keep sewing, ending by stitching onto one of your little starter scraps.


Clip threads between your square and the starter scrap, leaving the starter scrap in place, then turn your square around and sew 1/4" to the other side of the drawn line.


This is what your square should look like at this step:


Cut apart on drawn line.  The Creative Grids Quick Trim ruler makes quick work of this step as well.  The ruler as a dotted line at the 1/4" mark.  Simply line up the dotted line on the ruler with the drawn line on your square.  Cut on the drawn line.


Press the seam allowance toward the darker fabric in each pair.  You'll know have two half-square triangles from each set sewn.


The unit should measure 3 1/2" x 3 1/2" at this point.  That just happens to be the width of the Quick Trim Ruler, so it's super-easy to square up your squares!  Use the ruler to trim off the little excess at the corners of the block.  These are often referred to as "rabbit ears".  You'll want to trim them up so that they don't add extra bulk to your block.

Repeat steps with all color combinations.  You'll end up with 16 half-square triangle blocks.


As with most quilting techniques, there are many ways to accomplish the same goal  -  and many tools and gadgets to make your work easier.

Another way to make half-square triangles is to use a tool such as The Angler 2 by Pam Bono.  This tool eliminates the need to draw diagonal lines on your fabric.  If you are making lots of half-square triangles, this comes in very handy.

You'll tape the Angler 2 tool to the deck of your sewing machine.

Rather than drawing lines, you'll align the tip of the square with the left set of lines on the Angler tool.  Feed your square along, sewing to the end of the square as you continue to keep the point aligned with the line on  the Angler.

Turn square around and repeat.  Cut the square apart diagonally to yield to half square triangles.


Another similar tool is the Clearly Perfect Angle.  This tool works essentially the same way as the Angler 2, but is made from a static cling type material that sticks to your sewing deck.  The color coding on the Clearly Perfect Angle makes is easy to see where to align your squares.

Both tools work great for making flying geese units too!


Another one of my favorite time-saving tips is to chain piece my units.  This means that instead of starting and stopping when I sew each square, I continue sewing leaving a thread chain in between each of my squares.


I'll sew down the right side first, then will turn the entire chain around and sew down the other side.


I leave the unit chained together and take it back to my cutting board.


 I can align the center of the squares with the edge of my ruler to quickly cut apart the units.


I leave the triangles chained together and head to my ironing board.  I cam then quickly press the units open, clip the threads and stack them for my next step.


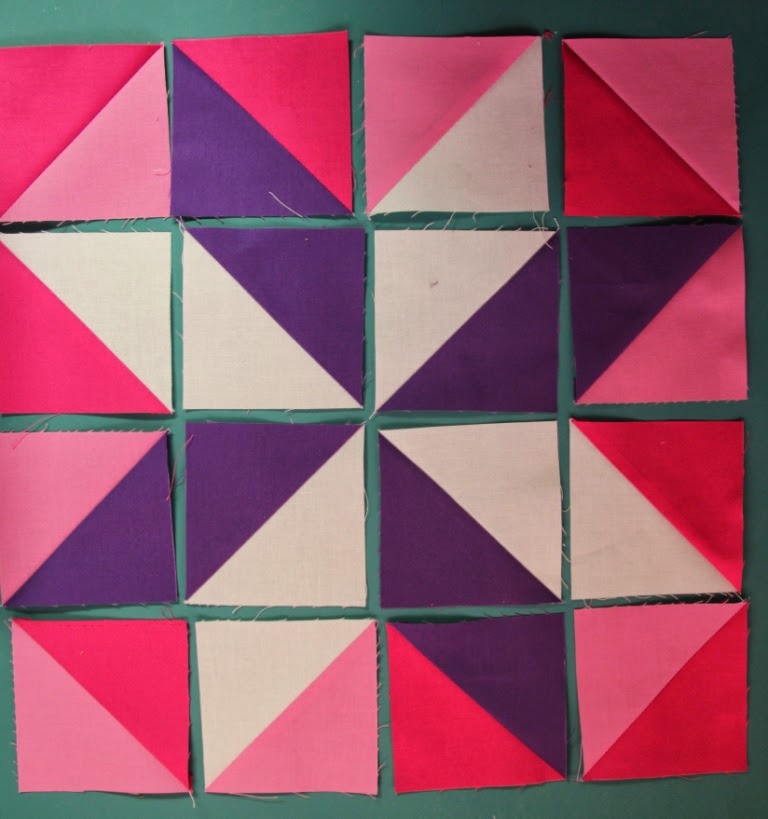
Once all the half-square triangles are made, it's time to arrange the units for the block.

Arrange the half-square triangles as pictured in four rows of four units each.


I once again use a chain piecing method to keep everything in order.

I flip the pieces in Row 2 right sides together with the pieces in Row 1.  Sew the units together, keeping them chained together.  In other words, don't clip your threads between the units.


Once Row 1 and 2 pieces are sewn together, I take the chain to my ironing board and press each seam in the opposite direction.  This will help the seams nest together when we join the rows.


Continue with the same method, flipping the pieces in Row 3 right sides together with Row 2.  Sew seam, chaining units together.  Press seams in opposite directions.


Once the four rows are sewn together vertically, join the rows together horizontally.


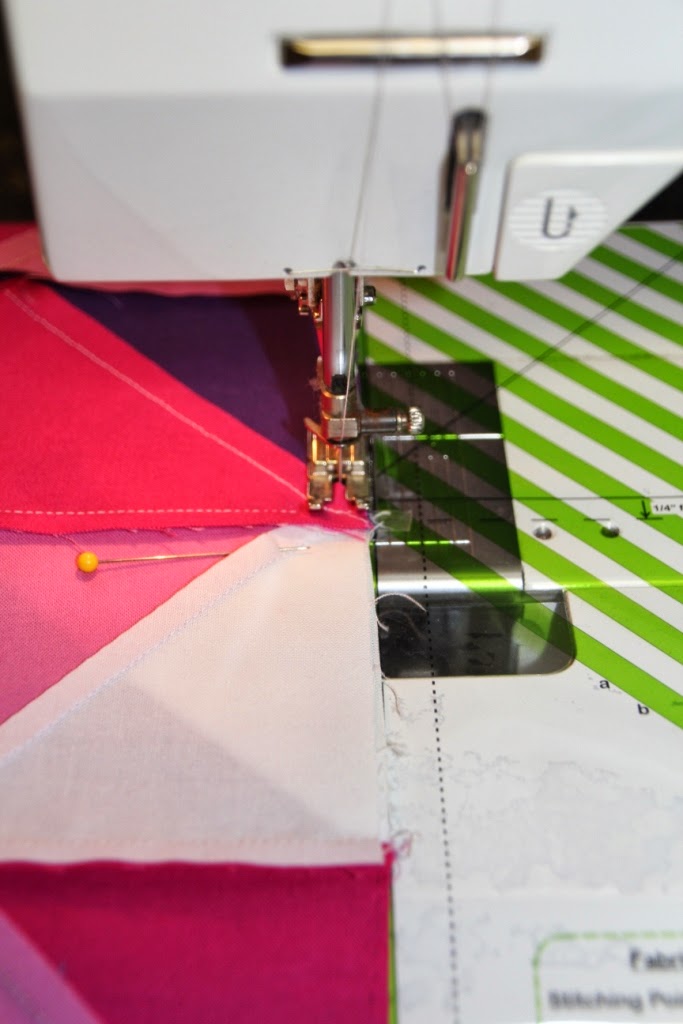
When you have several bulky seams to join together, you can sometimes use double stick tape to get a perfect seam match.  I learned this trick from the talented Peg Spradlin.  (You can learn all kinds of amazing quilting tricks from Peg.  Visit her blog at handicraftsbypeg )

Match up the intersection of the seams.  Position a pin on both sides of the seam.  Insert a tiny piece of double stick tape where the seams meet.  Be sure that the tape stays within the 1/4" seam allowance.  If you insert the tape too far, you'll end up sewing over it and it will be difficult to remove.  The tape is going to hold your pieces perfectly in place while you sew, but you want to be able to remove it after you have sewn the seam.


Sew the seam, then remove the tape.  Make sure you remove before pressing so that you don't accidently melt the tape.


 Continue to sew the rows together.


Block should now measure 12 1/2" x 12 1/2"


Congrats!  You made it through the 1st block!