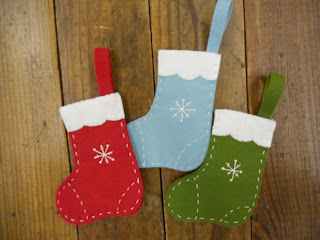
Here's a little tutorial for quick and easy Snowflake Stocking ornaments to help jump-start your holiday decorating.
I choose to use a super easy running stitch, rather than a blanket stitch for these ornaments so that they would be easy enough for even the most novice crafter to create. Have a girl scout troop or other kids group? These are even easy enough for elementary school aged kids to make.
Supplies Needed: (Makes one ornament: Approximate finished size: 3 1/2" x 4")
- 1 1/2" x 3" white wool blend felt for cuff
- 5" x 8" contrasting wool blend felt for stocking front and back (Can easily get four stockings from a 12" x 18" piece. Red, Moss, and Baby Blue are shown above.)
- White embroidery floss (could also use size 8 pearl cotton)
- Embroidery needle (I prefer the Clover Gold-Eye embroidery needles in the assorted size 3-9 pack)
- Freezer paper (for tracing your ornament pattern)
1. Print the ornament pattern. The size of the box around the ornament should be 4" x 5". You may have to adjust the size of the image when you print depending upon your printer settings.
2. Trace the ornament and cuff shape separately onto the paper side of freezer paper.
3. Cut loosely around the traced shapes, leaving about 1/4" of paper extending around the traced line.
4. Iron the waxed side of the freezer paper to the wool blend felt.
5. Cut out stocking shape on traced line.
6. Repeat for cuff shape.
7. Position cuff on top of stocking. You can either use a couple drops of Roxanne's Glue Baste It to temporarily hold in place, pin, or simply hold in place while you stitch.8. Use one strand of white embroidery floss to tack the bottom and top of the cuff to the stocking. You don't need to tack the sides, as they will be caught when you sew the back of the stocking in place.
10. Add snowflake detail. Use two strands of embroidery floss, stitch an X on the upper stocking. Then stitch another X to form the snowflake.
11. Add two small crosshatches to alternating spokes of the X. Add a french knot to the remaining spokes.
12. Place stocking right sides up on another piece of felt. Cut around stocking to create the backing. You could also use your freezer paper template to cut the backing. I prefer to cut around my completed shape, however, as sometimes the stitching process can slightly alter the size of your shape.
13. Cut a strip of felt 3/8" x 4 1/2" long. Fold in half lengthwise to form hanging loop. Attach to the top corner of the wrong side of the stocking back using a small X stitch. The X will be visible on the outside of the stocking.
14. Layer stocking back and front wrong sides together. Stitch around sides and bottom of stocking using a run stitch to attach the backing. Leave the top of the stocking open. This way you can use it as a money holder, or can tuck other little treats inside.
15. Enjoy!


No comments:
Post a Comment