Welcome to our second row. I hope everyone was able to work on the stars in the last couple weeks.
We're moving on to the log cabin blocks this week.
I cut out all 8 of my log cabin blocks at the same time, so I could chain sew them all at the same time.
I made mine an organized scrappy look. Here is what I used. I sorted through all of the fabrics and sorted by colors, all of my whites together (minus the white/silver stripe), all of my pinks together, all of my greens, and all of my aquas together.
I then cut strips of all my fabrics of width specified in the pattern...I used 17 strips of white, 8 strips each of pinks, 8 strips of green, and 8 strips of aqua. I usually cut one or two strips off each of my fabrics, until I reached the desired numbers.
Once I had these cut, I cut these to length. (You will have a little scrap left over. I just placed the scraps in a bag for use later.)
I also cut a strip of my red fabric and cut to the exact size.
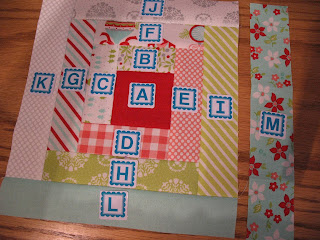
As I cut my fabrics, I placed my Alphabitties on each set.
After I had all of my pieces cut, I arranged them according to the diagram on the pattern.
I then picked up A and B and started sewing. You will always want the new piece on the right.
Sew A and B together and press.
I always pressed to the piece I had just sewn to the block. Continue around the block, making sure that your new piece is on the right of the block and the previous strip you just added is on the bottom.
Here are pics of the process. (Sorry for picture overload.) Pressing after each seam.
Here is the back of the finished block, all pressed.
You will soon have 8 beautiful blocks.
I then stacked in two piles and sewed my blocks in twos, then fours.
Your finished row should now measure 72-1/2". If it is a little longer, deepen your seam a smidge, if your finished row is shorter, you'll have to rip (I'm sorry) and take a smaller seam.
I then added another of my sashing strips cut to length to the bottom of this row and sewed.
I got so excited when I got this far, that I had to sew it to the star blocks.
Finished and I'm loving how it is going together. These are easy blocks to sew together and they are made easier by keeping everything marked, laying the block down after pressing and making sure the block is still rotating in the correct position.
Post your work on our Facebook page and if you have any questions, at any time, post those on there also.


No comments:
Post a Comment